If you’re like me, you probably like coding and learning new technologies. One such technology that you must learn is Git. In this article, let’s go through the fundamentals of Git and I promise to make Git as simple as pie for you.
We’ll take it step-by-step, ensuring you understand one concept before moving on to the next. Let’s dive right in.

Git is a distributed version control system that helps to handle everything from small to very large projects with speed and efficiency. It can track changes in your code, collaborate with others, and even revert to previous versions of your project if need be.
You can easily download Git from the official website (https://git-scm.com/downloads). After installation, open your terminal (or command prompt), and type:

This command will confirm whether Git was installed successfully or not.
Now that you have Git installed, it’s time to set up your personal information. This information is important because every Git commit uses this information.
Run the following commands to set up your user name and email:

A repository (or “repo”) is like a project folder, which contains all your project files along with a .git directory that tracks all your changes.
To create a new repo, navigate to your project directory using the command line and type:
We will see an example by creating a file in our project folder and adding some content.
Let’s add a README file to our project. A README file is a document that introduces an overview of a project to the user.
Use this command to create a
To tell Git to track our README file, we’ll use the following command:
This stages the file, preparing it for commitment.
Now, to commit the changes, we can use the following command:

This saves the staged changes along with a descriptive message.
You can see the current state of your repo (which files have changed, which ones are staged for the next commit, and more) by running the following command:
Git keeps a log of all your commits. You can check this log by running the following command:
Branching is one of Git’s most powerful features. It allows you to diverge from the main line of development and continue work without messing up the main line.
For example, let’s say we want to add a new feature to our project, but we don’t want to interfere with the master code. We can create a new branch with the following command:
Then, to switch to our new branch and start working on it, we can use the
You can confirm that you’re on the correct branch by typing the following:
The current branch will be highlighted.
Merging is a way to combine the work of different branches together. This allows you to branch off, develop a new feature, and then merge it back in when it’s ready.
Let’s say we’re done developing our new feature and want to merge the new-feature branch into master.
First, we switch back to the master branch:
Then, we perform the merge:
If there are no conflicts, Git will merge the two branches. If there are conflicts, Git will let you know, and you’ll need to resolve them manually.
We’ve been working locally till now, but Git allows you to work with remote repositories too. This is especially useful when collaborating with others.
Let’s say you have a project hosted on GitHub and you want to push your local changes to it.
Adding a Remote Repository:
First, you need to add the remote repository:
Replace repo-url with the actual URL of your repository.

Pushing Changes:
Once you’ve added the remote, you can push your local changes to the remote repository:
This pushes your
Pulling Changes:
The
Here’s an example:
This command pulls changes from the
Cloning a Repository:
The
This command will clone the repository located at .

Note: In order to push to a remote repository, you’ll need to have the correct permissions to do so.
Forking is creating a copy of a repository, allowing you to make changes without affecting the original repo. A pull request is proposing your changes to the original repo owner. If they like your changes, they can merge them into their repository.
On GitHub, you can simply click the “Fork” button to fork a repository. After making your changes and pushing them to your fork, you can open a pull request by clicking “New pull request” in the original repository.
Phew! That was a lot of ground to cover, but I hope it was digestible. Now you have a strong base to explore more advanced Git features. Make sure to try out these concepts by yourself. You can download this Git cheat sheet to try out more commands.
Don’t hesitate to experiment and make mistakes—that’s how we learn.
Happy coding!
We’ll take it step-by-step, ensuring you understand one concept before moving on to the next. Let’s dive right in.
Step 1: What is Git?
Git is a distributed version control system that helps to handle everything from small to very large projects with speed and efficiency. It can track changes in your code, collaborate with others, and even revert to previous versions of your project if need be.
Step 2: Installation
You can easily download Git from the official website (https://git-scm.com/downloads). After installation, open your terminal (or command prompt), and type:
git --version
This command will confirm whether Git was installed successfully or not.
Step 3: Configuring Git
Now that you have Git installed, it’s time to set up your personal information. This information is important because every Git commit uses this information.
Run the following commands to set up your user name and email:
git config --global user.name "Your Name"git config --global user.email "[email protected]"
Step 4: Creating a New Repository
A repository (or “repo”) is like a project folder, which contains all your project files along with a .git directory that tracks all your changes.
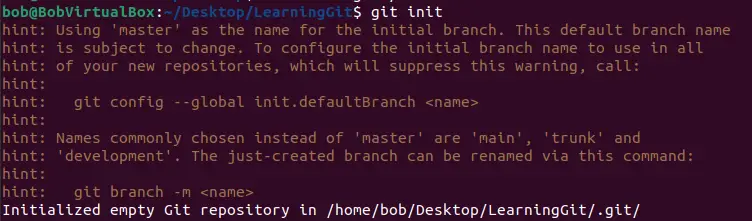
To create a new repo, navigate to your project directory using the command line and type:
git init
Step 5: Making Changes and Committing Them
We will see an example by creating a file in our project folder and adding some content.
Let’s add a README file to our project. A README file is a document that introduces an overview of a project to the user.
Use this command to create a
README.md file:echo "# My Project" >> README.mdTo tell Git to track our README file, we’ll use the following command:
git add README.mdThis stages the file, preparing it for commitment.
Now, to commit the changes, we can use the following command:
git commit -m "Added README.md"
This saves the staged changes along with a descriptive message.
Step 6: Checking the Status of Your Repo
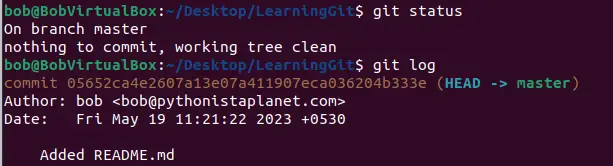
You can see the current state of your repo (which files have changed, which ones are staged for the next commit, and more) by running the following command:
git statusStep 7: Exploring Git History
Git keeps a log of all your commits. You can check this log by running the following command:
git log
Step 8: Branching
Branching is one of Git’s most powerful features. It allows you to diverge from the main line of development and continue work without messing up the main line.
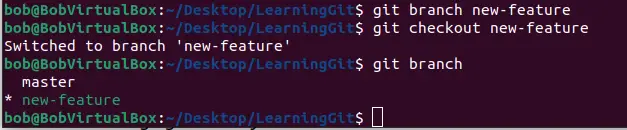
For example, let’s say we want to add a new feature to our project, but we don’t want to interfere with the master code. We can create a new branch with the following command:
git branch new-featureThen, to switch to our new branch and start working on it, we can use the
checkout command:git checkout new-featureYou can confirm that you’re on the correct branch by typing the following:
git branchThe current branch will be highlighted.
Step 9: Merging
Merging is a way to combine the work of different branches together. This allows you to branch off, develop a new feature, and then merge it back in when it’s ready.
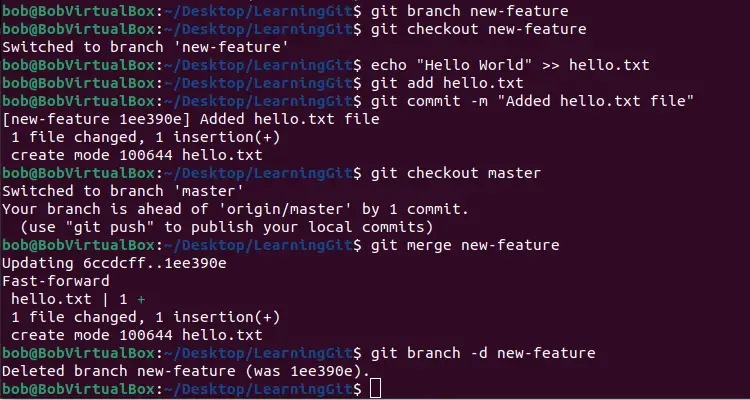
Let’s say we’re done developing our new feature and want to merge the new-feature branch into master.
First, we switch back to the master branch:
git checkout masterThen, we perform the merge:
git merge new-feature
If there are no conflicts, Git will merge the two branches. If there are conflicts, Git will let you know, and you’ll need to resolve them manually.
Step 10: Working with Remote Repositories
We’ve been working locally till now, but Git allows you to work with remote repositories too. This is especially useful when collaborating with others.
Let’s say you have a project hosted on GitHub and you want to push your local changes to it.
Adding a Remote Repository:
First, you need to add the remote repository:
git remote add origin repo-urlReplace repo-url with the actual URL of your repository.
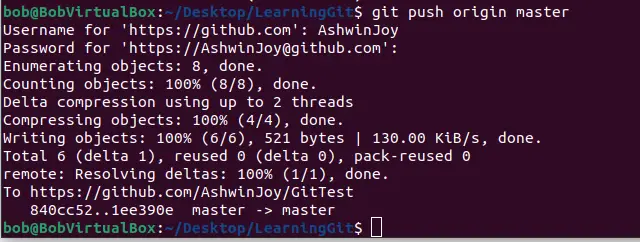
Pushing Changes:
Once you’ve added the remote, you can push your local changes to the remote repository:
git push origin master
This pushes your
master branch to the origin remote.Pulling Changes:
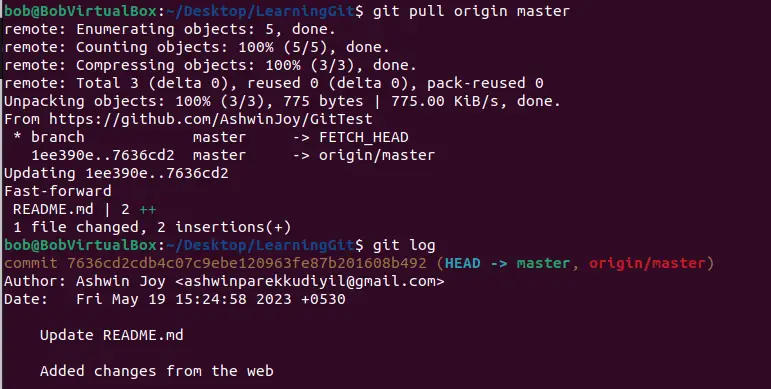
The
git pull command is used to fetch and download content from a remote repository and immediately update the local repository to match that content.Here’s an example:
git pull origin masterThis command pulls changes from the
master branch of the origin remote into the current local branch.
Cloning a Repository:
The
git clone command is used to target an existing repository and create a clone, or copy of the target repository. Here’s an example:git clone https://github.com/user/repo.gitThis command will clone the repository located at .
Note: In order to push to a remote repository, you’ll need to have the correct permissions to do so.
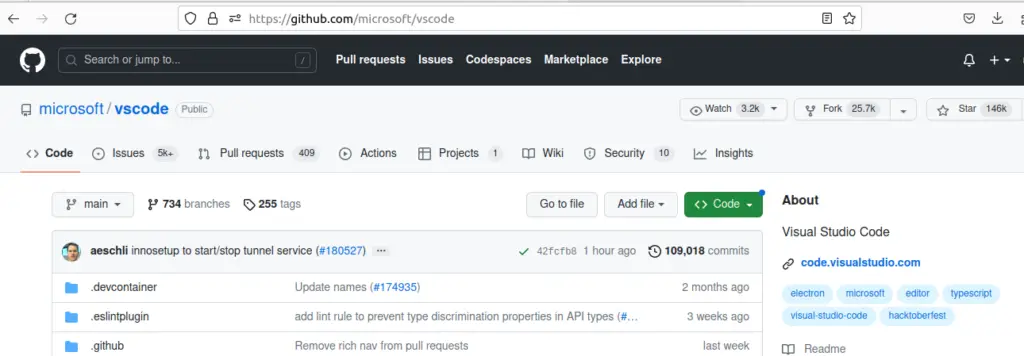
Step 11: Forking and Pull Requests
Forking is creating a copy of a repository, allowing you to make changes without affecting the original repo. A pull request is proposing your changes to the original repo owner. If they like your changes, they can merge them into their repository.
On GitHub, you can simply click the “Fork” button to fork a repository. After making your changes and pushing them to your fork, you can open a pull request by clicking “New pull request” in the original repository.
Final Thoughts
Phew! That was a lot of ground to cover, but I hope it was digestible. Now you have a strong base to explore more advanced Git features. Make sure to try out these concepts by yourself. You can download this Git cheat sheet to try out more commands.
Don’t hesitate to experiment and make mistakes—that’s how we learn.
Happy coding!