An API is a set of rules and protocols that allows one software app to interact with another. It defines the methods and data formats that can be used by applications to request and exchange information.
There are many ways to design an API over the web. Some examples are REST, SOAP, GraphQL, and gRPC, each with its own set of conventions and principles.
While all REST APIs are APIs, not all APIs are RESTful. When someone says “REST API,” they are specifically referring to an API that adheres to the principles and constraints of REST. Let’s see what a REST API is.
REST (Representational State Transfer) is an architectural style for designing networked apps. A REST API uses HTTP requests to perform CRUD (Create, Read, Update, Delete) operations on data, making it easy for systems to communicate with each other.
By specifying “REST API,” it’s clear that:
Key Concepts:
Flask is a lightweight Python web framework. It’s perfect for creating RESTful APIs due to its simplicity and flexibility.
To set up Flask, you’ll need to install it first:
Let’s create a Flask application to demonstrate how REST APIs work.
jsonify is a Flask function to convert Python data structures, like dictionaries and lists, into JSON format, and then return it as an HTTP response. JSON (JavaScript Object Notation) is a lightweight data interchange format that’s easy for humans to read and write and easy for machines to parse and generate.
Example of JSON data:
Here’s a brief breakdown of what
The jsonify function is essential for building RESTful APIs with Flask, as it allows for easy serialization of data to be sent to clients.
Routes determine how an application responds to a specific web address or URL. Think of them as paths or directions. For example, on a website:
Now, let’s create the routes to see how GET, POST, PUT, and DELETE work in Flask.
With this setup, you have a basic REST API using Flask. You can retrieve all tasks, get details of a specific task, and add a new task.
Here is the complete code for the application:
Now, let’s see how to make the API calls. We can use a UI tool like Postman to make the API calls easily. On the command prompt, you can also run it using curl.
GET Request:
To get all the tasks:
To get a specific task:
Output:
POST Request: To create a new resource. You’ll often send data as JSON.
When using curl in the Windows Command Prompt, you might encounter issues with double quotes. If you face problems, try using double quotes for the entire -d data string and escape the inner quotes:
Additional Notes:
Output:

PUT Request: To update an existing resource. Here, we’re updating a task with ID
On Windows, use:
Output:
DELETE Request: To delete a specific resource. Here, we’re deleting a task with an ID
Output:
Flask makes it straightforward to build RESTful APIs. You can leverage the simplicity of Flask to create powerful APIs to enable communication between systems. As you delve deeper, you can explore Flask extensions like Flask-RESTful to streamline the process further.
There are many ways to design an API over the web. Some examples are REST, SOAP, GraphQL, and gRPC, each with its own set of conventions and principles.
While all REST APIs are APIs, not all APIs are RESTful. When someone says “REST API,” they are specifically referring to an API that adheres to the principles and constraints of REST. Let’s see what a REST API is.
What is a REST API?
REST (Representational State Transfer) is an architectural style for designing networked apps. A REST API uses HTTP requests to perform CRUD (Create, Read, Update, Delete) operations on data, making it easy for systems to communicate with each other.
By specifying “REST API,” it’s clear that:
- It uses standard HTTP methods (like GET, POST, PUT, DELETE).
- It is stateless, meaning each request from a client contains all the information needed to process the request.
- It treats service endpoints as resources, often with URLs representing these resources.
- It typically communicates using JSON or XML.
Key Concepts:
- Resources: In REST, data entities (like users, products, or orders) are considered resources. These resources can be accessed via a unique URL.
- HTTP Methods: RESTful services use standard HTTP methods:
- GET to retrieve data.
- POST to create data.
- PUT or PATCH to update data.
- DELETE to remove data.
- Status codes are three-digit numbers returned by web servers to indicate the outcome of an HTTP request. They help clients, like browsers, understand if a request was successful or if there was an issue.
- 1xx: Informational (e.g., 100 Continue)
- 2xx: Successful (e.g., 200 OK)
- 3xx: Redirection (e.g., 301 Moved Permanently)
- 4xx: Client Errors (e.g., 404 Not Found)
- 5xx: Server Errors (e.g., 500 Internal Server Error)
Setting Up Flask for REST API
Flask is a lightweight Python web framework. It’s perfect for creating RESTful APIs due to its simplicity and flexibility.
To set up Flask, you’ll need to install it first:
[ICODE]pip install Flask[/ICODE]Let’s create a Flask application to demonstrate how REST APIs work.
1. Setting Up the Application
Code:
from flask import Flask, jsonify, request

app = Flask(__name__)

tasks = [
    {"id": 1, "title": "Learn Flask"},
    {"id": 2, "title": "Learn REST APIs"}
]
2. The jsonify method in Flask
jsonify is a Flask function to convert Python data structures, like dictionaries and lists, into JSON format, and then return it as an HTTP response. JSON (JavaScript Object Notation) is a lightweight data interchange format that’s easy for humans to read and write and easy for machines to parse and generate.
Example of JSON data:
Code:
{
    "name": "Ashwin",
    "age": 26
}
Here’s a brief breakdown of what
jsonify does:- Converts Data to JSON: It takes a Python data structure (like a dictionary) and converts it into a JSON-formatted string.
- Sets the MIME Type: It sets the MIME type of the response to
application/json. This tells the client (like a web browser or another API) that the server is sending back JSON-formatted data. - Returns an HTTP Response: It wraps the JSON data in an HTTP response that can be returned from a Flask route.
The jsonify function is essential for building RESTful APIs with Flask, as it allows for easy serialization of data to be sent to clients.
3. Creating Routes
Routes determine how an application responds to a specific web address or URL. Think of them as paths or directions. For example, on a website:
- The “/” route might show the homepage.
- The /about route might display an about page.
Now, let’s create the routes to see how GET, POST, PUT, and DELETE work in Flask.
GET all tasks:
Code:
@app.route('/tasks', methods=['GET'])
def get_tasks():
    return jsonify(tasks)
GET a specific task:
Code:
@app.route('/tasks/<int:task_id>', methods=['GET'])
def get_task(task_id):
    for task in tasks:
        if task['id'] == task_id:
            return jsonify(task)
    return jsonify({"message": "Task not found"})
POST a new task:
Code:
@app.route('/tasks', methods=['POST'])
def add_task():
    new_task = request.get_json()
    tasks.append(new_task)
    return jsonify({"message": "Task added successfully"})
PUT to update an existing task:
Code:
@app.route('/tasks/<int:task_id>', methods=['PUT'])
def update_task(task_id):
    for task in tasks:
        if task['id'] == task_id:
            task['title'] = request.json['title']
            return jsonify({"message": "Task updated successfully"})
    return jsonify({"message": "Task not found"})
DELETE to remove a task:
Code:
@app.route('/tasks/<int:task_id>', methods=['DELETE'])
def delete_task(task_id):
    for task in tasks:
        if task['id'] == task_id:
            tasks.remove(task)
            return jsonify({"message": "Task deleted successfully"})
    return jsonify({"message": "Task not found"})
4. Running the Application:
Code:
if __name__ == "__main__":
    app.run(debug=True)
With this setup, you have a basic REST API using Flask. You can retrieve all tasks, get details of a specific task, and add a new task.
Here is the complete code for the application:
Code:
from flask import Flask, jsonify, request

app = Flask(__name__)

tasks = [
    {"id": 1, "title": "Learn Flask"},
    {"id": 2, "title": "Learn REST APIs"}
]

@app.route('/tasks', methods=['GET'])
def get_tasks():
    return jsonify(tasks)

@app.route('/tasks/<int:task_id>', methods=['GET'])
def get_task(task_id):
    for task in tasks:
        if task['id'] == task_id:
            return jsonify(task)
    return jsonify({"message": "Task not found"})

@app.route('/tasks', methods=['POST'])
def add_task():
    new_task = request.get_json()
    tasks.append(new_task)
    return jsonify({"message": "Task added successfully"})

@app.route('/tasks/<int:task_id>', methods=['PUT'])
def update_task(task_id):
    for task in tasks:
        if task['id'] == task_id:
            task['title'] = request.json['title']
            return jsonify({"message": "Task updated successfully"})
    return jsonify({"message": "Task not found"})

@app.route('/tasks/<int:task_id>', methods=['DELETE'])
def delete_task(task_id):
    for task in tasks:
        if task['id'] == task_id:
            tasks.remove(task)
            return jsonify({"message": "Task deleted successfully"})
    return jsonify({"message": "Task not found"})

if __name__ == "__main__":
    app.run(debug=True)
5. Testing the Application using curl
Now, let’s see how to make the API calls. We can use a UI tool like Postman to make the API calls easily. On the command prompt, you can also run it using curl.
curl is a command-line tool used for testing APIs. Here’s how you can use curl to make API calls corresponding to the different HTTP methods:GET Request:
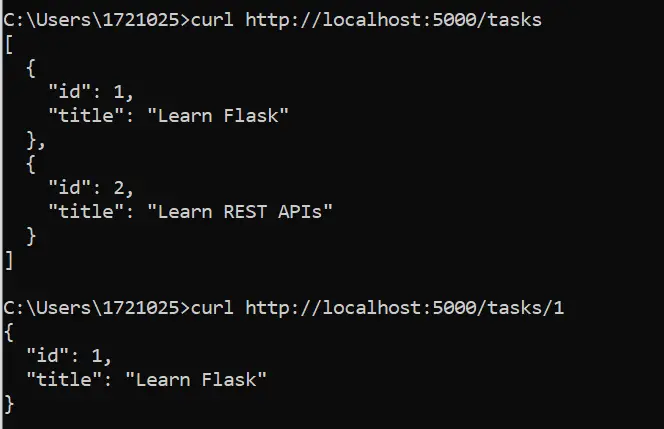
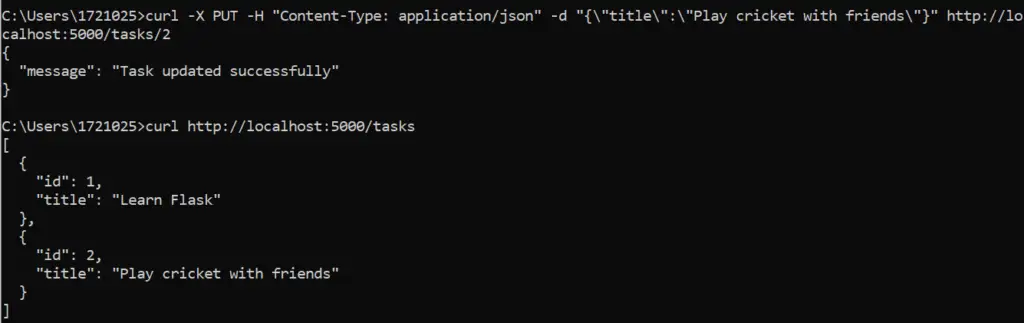
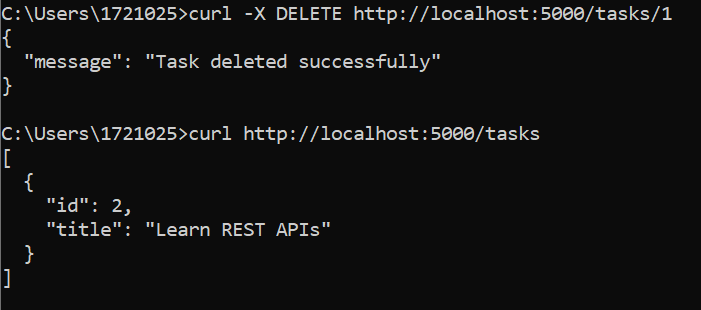
To get all the tasks:
curl http://localhost:5000/tasksTo get a specific task:
curl http://localhost:5000/tasks/1Output:
POST Request: To create a new resource. You’ll often send data as JSON.
curl -X POST -H "Content-Type: application/json" -d '{"id":3,"title":"Read a book"}' http://localhost:5000/tasksWhen using curl in the Windows Command Prompt, you might encounter issues with double quotes. If you face problems, try using double quotes for the entire -d data string and escape the inner quotes:
curl -X POST -H "Content-Type: application/json" -d "{\"id\":3,\"title\":\"Read a book\"}" http://localhost:5000/tasksAdditional Notes:
- The
-Xflag specifies the HTTP method. - The
-Hflag is used to set headers, likeContent-Type: application/json, which informs the server that we’re sending JSON data. - The
-dflag sends data in the request body, which is often used with POST and PUT requests to send the data you want to create or update.
Output:
PUT Request: To update an existing resource. Here, we’re updating a task with ID
1.curl -X PUT -H "Content-Type: application/json" -d '{"title":"Play cricket with friends"}' http://localhost:5000/tasks/2On Windows, use:
curl -X PUT -H "Content-Type: application/json" -d "{\"title\":\"Play cricket with friends\"}" http://localhost:5000/tasks/2Output:
DELETE Request: To delete a specific resource. Here, we’re deleting a task with an ID
1.curl -X DELETE http://localhost:5000/tasks/1Output:
Conclusion
Flask makes it straightforward to build RESTful APIs. You can leverage the simplicity of Flask to create powerful APIs to enable communication between systems. As you delve deeper, you can explore Flask extensions like Flask-RESTful to streamline the process further.